How to Check Sensor Working in Android (2026 Complete Guide)
Android smartphones use multiple sensors to perform everyday tasks like screen rotation, call detection, navigation, and gaming. If any sensor stops working, your phone may behave abnormally. In this guide, you will learn how to check Android sensors and fix common issues.
Table of Contents
- What Are Mobile Sensors?
- Types of Sensors in Android
- Why Sensors Stop Working
- Common Problems Caused by Sensor Issues
- Impact on Daily Usage
- Check Sensors via Phone Settings
- Use Secret Codes to Test Sensors
- Use Apps to Test Sensors
- Manual Sensor Testing Methods
- How to Fix Sensor Problems
- When to Visit Service Center
- Final Tips
1. What Are Mobile Sensors?
Mobile sensors are small hardware components inside your Android smartphone that detect changes in the physical environment and convert them into actions your device can understand. These sensors are essential for making smartphones responsive, efficient, and easy to use.
Instead of relying only on manual input, sensors allow your phone to react automatically to movement, light, and surroundings. This is why features like screen rotation, auto-brightness, and call detection work seamlessly in the background without user intervention.
Key Functions of Mobile Sensors:
- Detect motion and orientation for screen rotation and gaming
- Measure light levels to adjust screen brightness automatically
- Sense proximity to turn off the display during calls
- Enable navigation and direction tracking using compass functionality
These sensors continuously collect real-time data and send it to the system, helping your phone deliver a smooth and intelligent experience. Without them, many important features would stop working properly or require manual control.
For example, if your screen does not rotate or the display stays on during calls, it may indicate a sensor-related issue. In such cases, understanding the cause is important before applying any fixes.
In simple terms, mobile sensors act as the backbone of smart features that make modern Android devices faster, more efficient, and user-friendly.
2. Types of Sensors in Android
Android smartphones are equipped with multiple sensors that work together to deliver a smooth and intelligent user experience. Each sensor has a specific role, helping your device respond accurately to movement, environment, and user actions.
Understanding these sensors can help you identify issues faster and improve how you use your device in daily life.
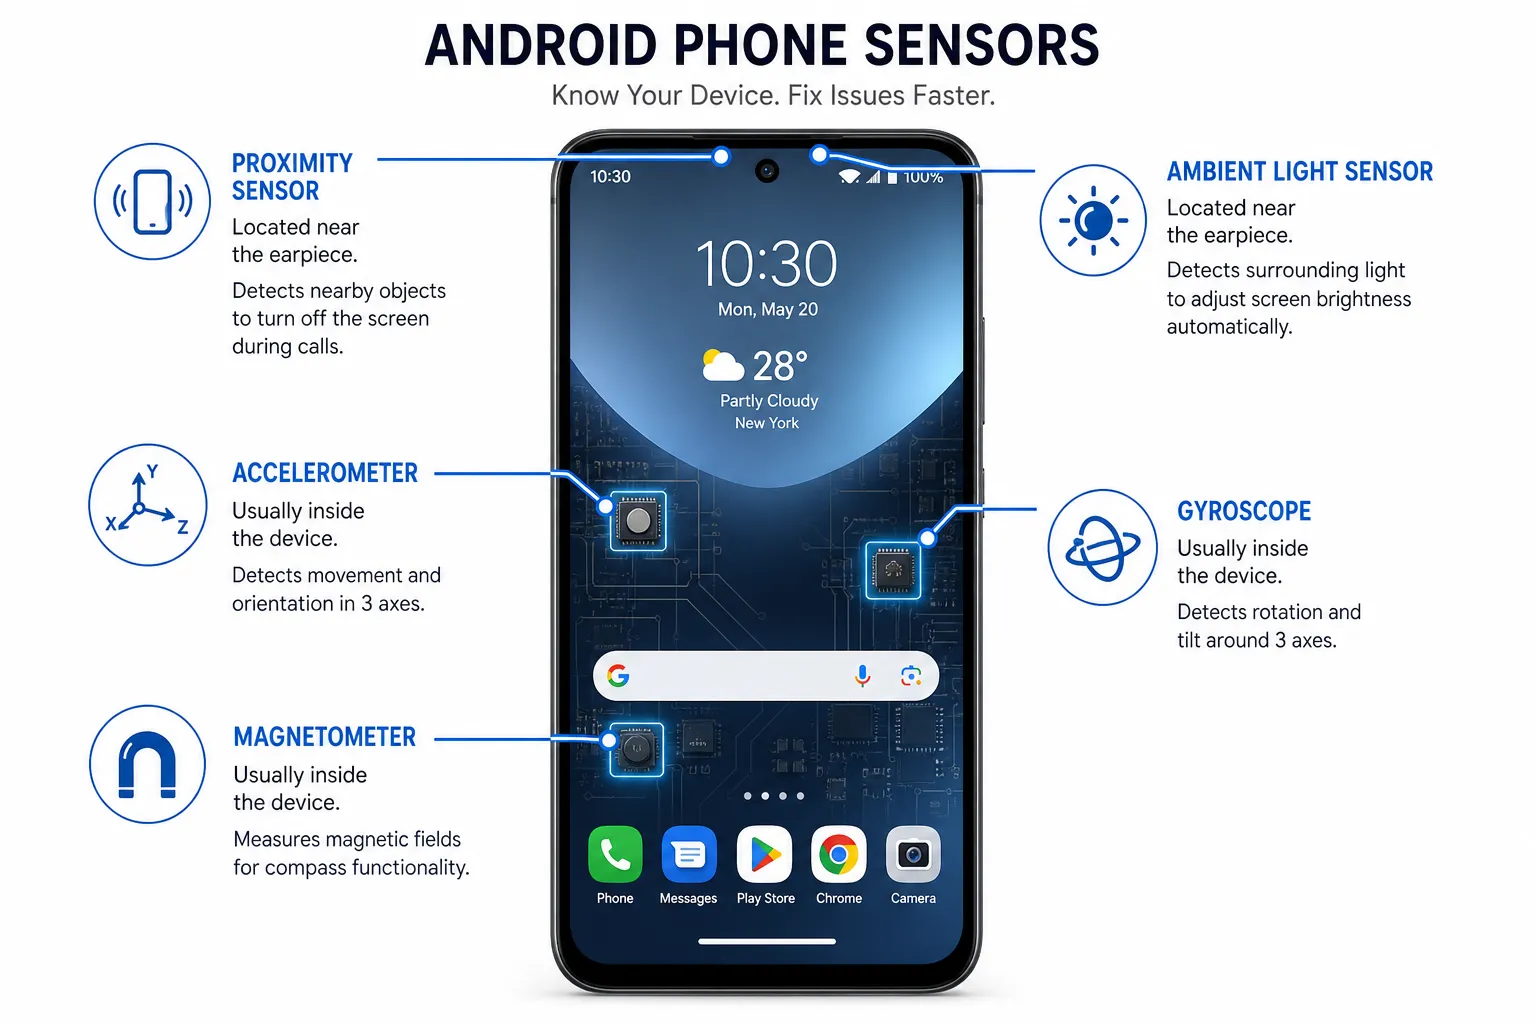
Main Types of Sensors in Android:
- Proximity Sensor: Detects how close an object is to the phone. It is mainly used during calls to turn off the screen when the phone is near your ear, preventing accidental touches.
- Accelerometer: Measures motion and orientation. It helps in features like screen rotation, step counting, and motion-based controls in apps and games.
- Gyroscope: Works along with the accelerometer to provide precise rotation tracking. It enhances gaming, augmented reality, and smooth screen transitions.
- Ambient Light Sensor: Detects surrounding light conditions and automatically adjusts screen brightness. This improves visibility and helps save battery life.
- Magnetometer (Compass): Identifies the device’s direction relative to the Earth’s magnetic field. It is essential for navigation apps and map orientation.
These sensors constantly collect data in real time, allowing your phone to adapt quickly to changes in its environment. If any of these sensors stop working, you may notice issues like incorrect screen rotation, poor brightness adjustment, or navigation errors.
Having a basic understanding of these sensor types makes it easier to diagnose problems and ensure your Android device continues to perform efficiently.
3. Why Sensors Stop Working
Android sensors are designed to work reliably, but they can stop functioning properly due to a mix of software and hardware-related issues. When a sensor fails, it can affect multiple features like screen rotation, brightness adjustment, and call behavior.
Understanding the common causes behind sensor failure helps you diagnose the issue quickly and apply the right solution.
Common Reasons Why Sensors Stop Working:
- Software bugs or system glitches: Temporary issues in the operating system can interrupt sensor functionality, especially after updates or app installations.
- Outdated Android version: Running an older version of Android may cause compatibility problems, leading to sensors not responding correctly.
- Physical damage or dust: Drops, water exposure, or dirt accumulation near the sensor area can block or damage the hardware.
- App conflicts or permission issues: Certain apps may interfere with sensor data or restrict access due to incorrect permissions.
In many cases, sensor issues are temporary and can be fixed with simple steps like restarting the device or updating the system. However, if the problem is caused by hardware damage, professional repair may be required.
For more detailed and official guidance on Android functionality and troubleshooting, you can refer to Official Android Help.
Identifying the root cause early ensures that your device continues to function smoothly without affecting daily usage.
4. Common Problems Caused by Sensor Issues
When sensors in your Android device stop working properly, it directly impacts everyday functions. Since many core features depend on sensor data, even a small issue can lead to noticeable problems in performance and usability.
Recognizing these problems early can help you take the right steps before the issue becomes more serious.
Most Common Sensor-Related Problems:
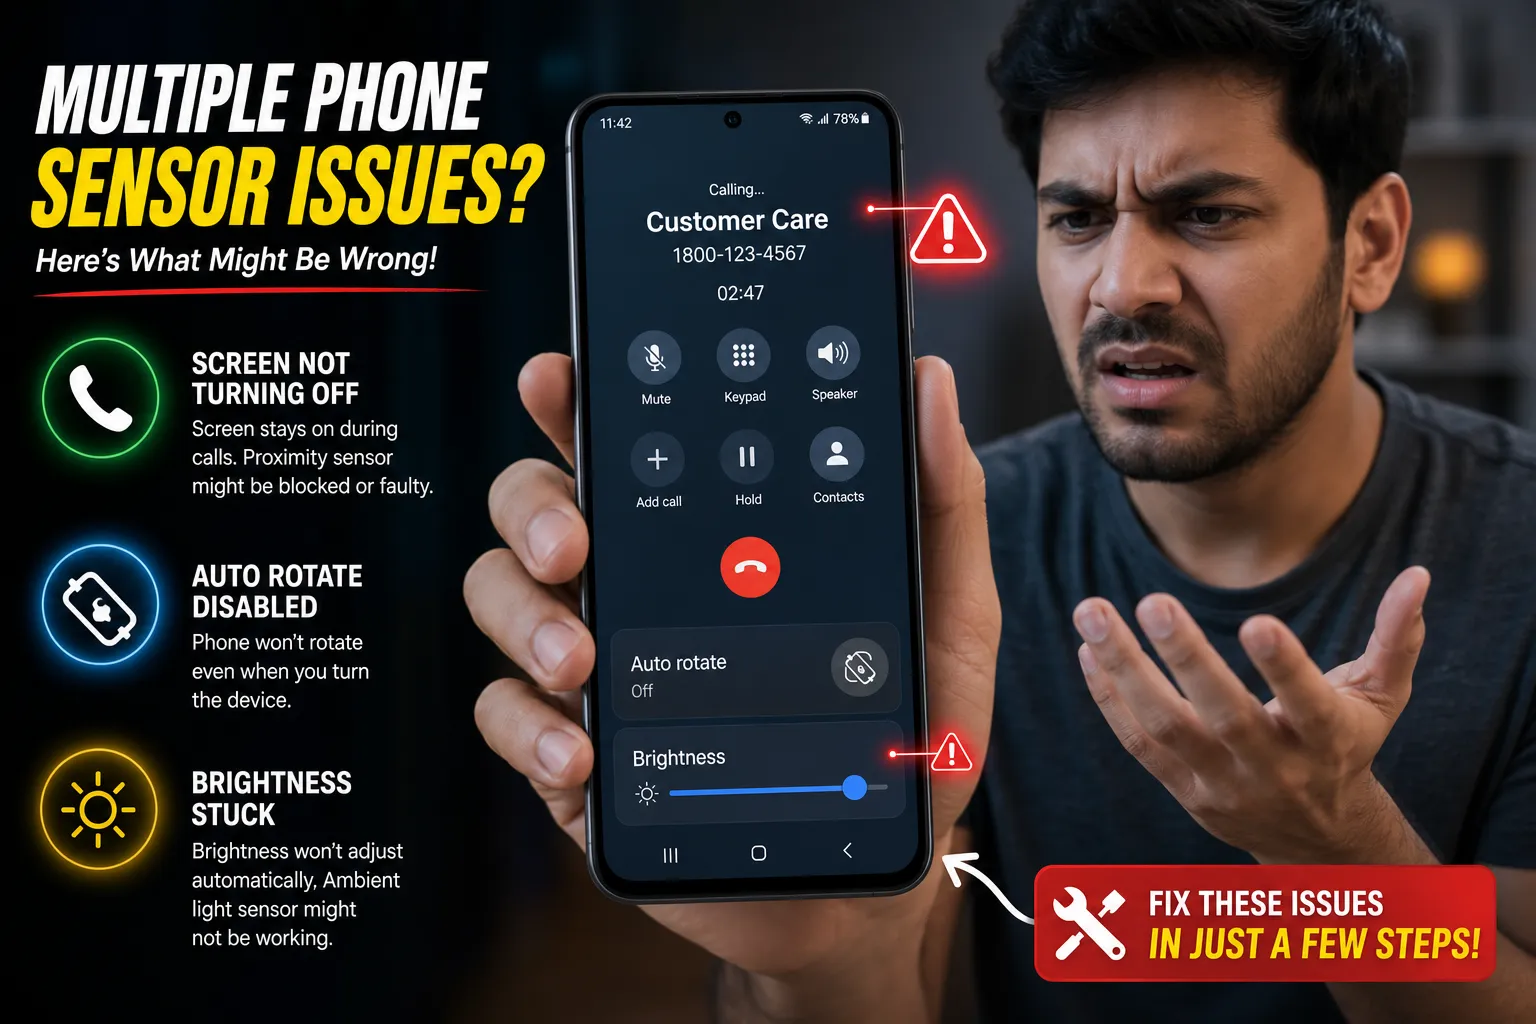
- Screen not turning off during calls: This usually indicates a proximity sensor issue, causing accidental touches while calling.
- Auto-rotate not working: If your screen does not rotate, the accelerometer or gyroscope may not be functioning correctly.
- Gaming controls not responding: Motion-based games rely heavily on sensors. Any delay or lack of response can affect gameplay.
- Brightness not adjusting automatically: A faulty ambient light sensor may prevent your phone from adapting to different lighting conditions.
These issues may appear minor at first but can significantly reduce the overall user experience if ignored. In some cases, they may also indicate deeper system or hardware problems.
To better understand how different device issues are connected and how to resolve them effectively, you can explore this detailed guide on common Android issues and their solutions.
By identifying these symptoms early, you can troubleshoot sensor-related problems more efficiently and keep your device running smoothly.
5. Impact on Daily Usage
Sensor issues in an Android device can significantly affect everyday usage, often without users immediately realizing the root cause. Since many core features depend on sensors, even a minor malfunction can disrupt multiple functions at once.
These problems are not limited to a single feature but can influence overall performance, usability, and user experience.
How Sensor Issues Affect Daily Usage:
- Calling experience: If the proximity sensor fails, the screen may stay on during calls, leading to accidental touches and interruptions.
- Gaming performance: Many mobile games rely on motion sensors. Faulty sensors can result in delayed or inaccurate controls.
- Navigation accuracy: GPS and compass features depend on sensor input. Issues may cause incorrect directions or unstable navigation.
- Display behavior: Problems with the light sensor can lead to improper brightness levels, affecting visibility and battery usage.
- Overall usability: Features like screen rotation and motion gestures may stop working, making the device feel unresponsive or inconsistent.
If your phone starts behaving abnormally, such as lagging or responding inconsistently, sensor malfunction could be one of the underlying reasons. In some cases, performance issues may also be linked to system-level problems. To understand this better, you can read about why Android becomes slow again.
Identifying the impact early allows you to take timely action and maintain a smooth and reliable smartphone experience.
6. Check Sensors via Phone Settings
Many Android smartphones include built-in diagnostic options that allow you to check whether sensors are working correctly. This method is simple, does not require any third-party apps, and is often the quickest way to identify basic sensor issues.
Although the exact steps may vary depending on the device brand and Android version, most phones provide sensor-related information within system settings.
Steps to Check Sensors via Settings:
- Open Settings on your phone
- Scroll down and tap About Phone
- Go to Status or Hardware Information
- Look for Sensor Info or similar options
In this section, you may find real-time data or basic status indicators for sensors like the proximity sensor, accelerometer, and light sensor. If values are changing when you move or interact with your device, the sensors are likely functioning properly.
Important Points to Consider:
- Not all Android devices provide detailed sensor information in settings
- Some brands hide these options or replace them with diagnostic tools
- If no sensor data is visible, you may need to use alternative testing methods
This built-in approach is useful for quick checks, especially when you suspect minor issues. However, if the sensors do not respond or the information is missing, it may indicate either a software limitation or a deeper problem that requires further testing.
Using phone settings as a first step helps you quickly verify sensor functionality before trying advanced troubleshooting methods.
7. Use Secret Codes to Test Sensors
Android devices often include hidden diagnostic menus that can be accessed using secret dial codes. These codes open built-in testing panels where you can directly check the performance of different hardware components, including sensors.
This method is especially useful because it does not require installing any third-party apps and provides quick access to detailed testing tools.
How to Use Secret Codes for Sensor Testing:
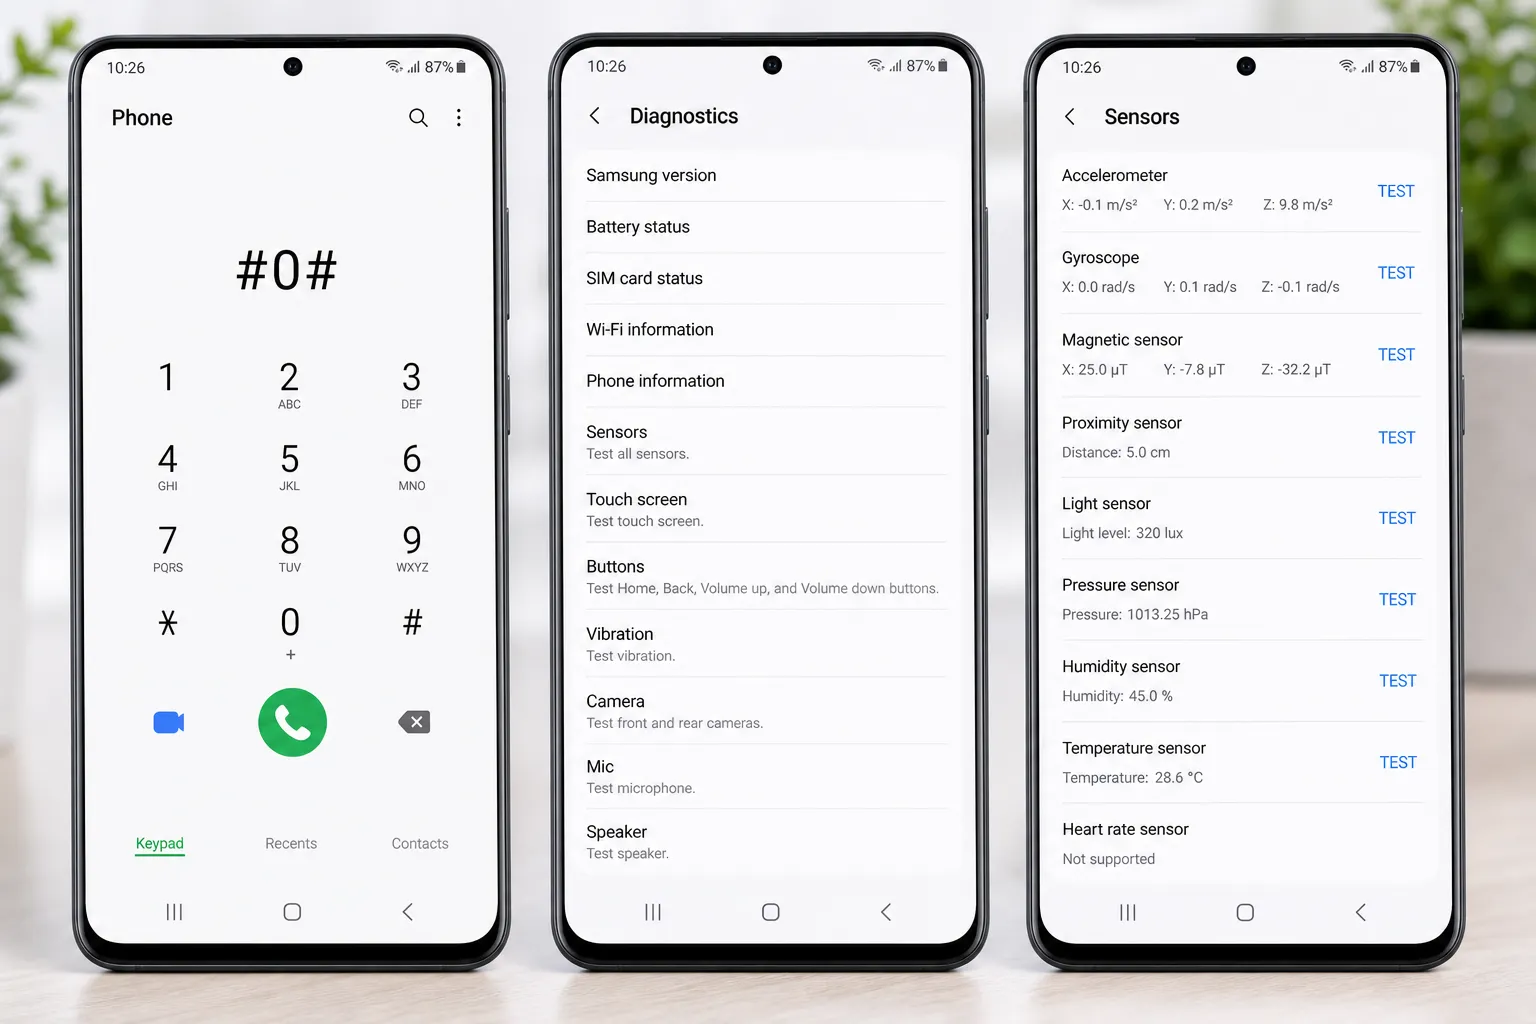
- Open the Phone Dialer on your device
- Enter the code *#0*#
- The hardware testing menu will open automatically (supported on some devices)
Once inside the testing panel, you will find multiple options to check sensors such as proximity, accelerometer, and gyroscope. By interacting with these tests, you can observe whether the sensors are responding correctly in real time.
Key Things to Keep in Mind:
- This code works mainly on certain brands like Samsung and may not function on all devices
- Different manufacturers use different codes for accessing diagnostic menus
- If the code does not work, your device may restrict access to hidden testing features
If the sensors fail to respond within the testing menu, it could indicate a deeper issue related to software or hardware. In such cases, further testing using apps or advanced troubleshooting methods may be required.
Using secret codes is one of the fastest ways to verify sensor functionality and identify potential problems without additional tools.
8. Use Apps to Test Sensors
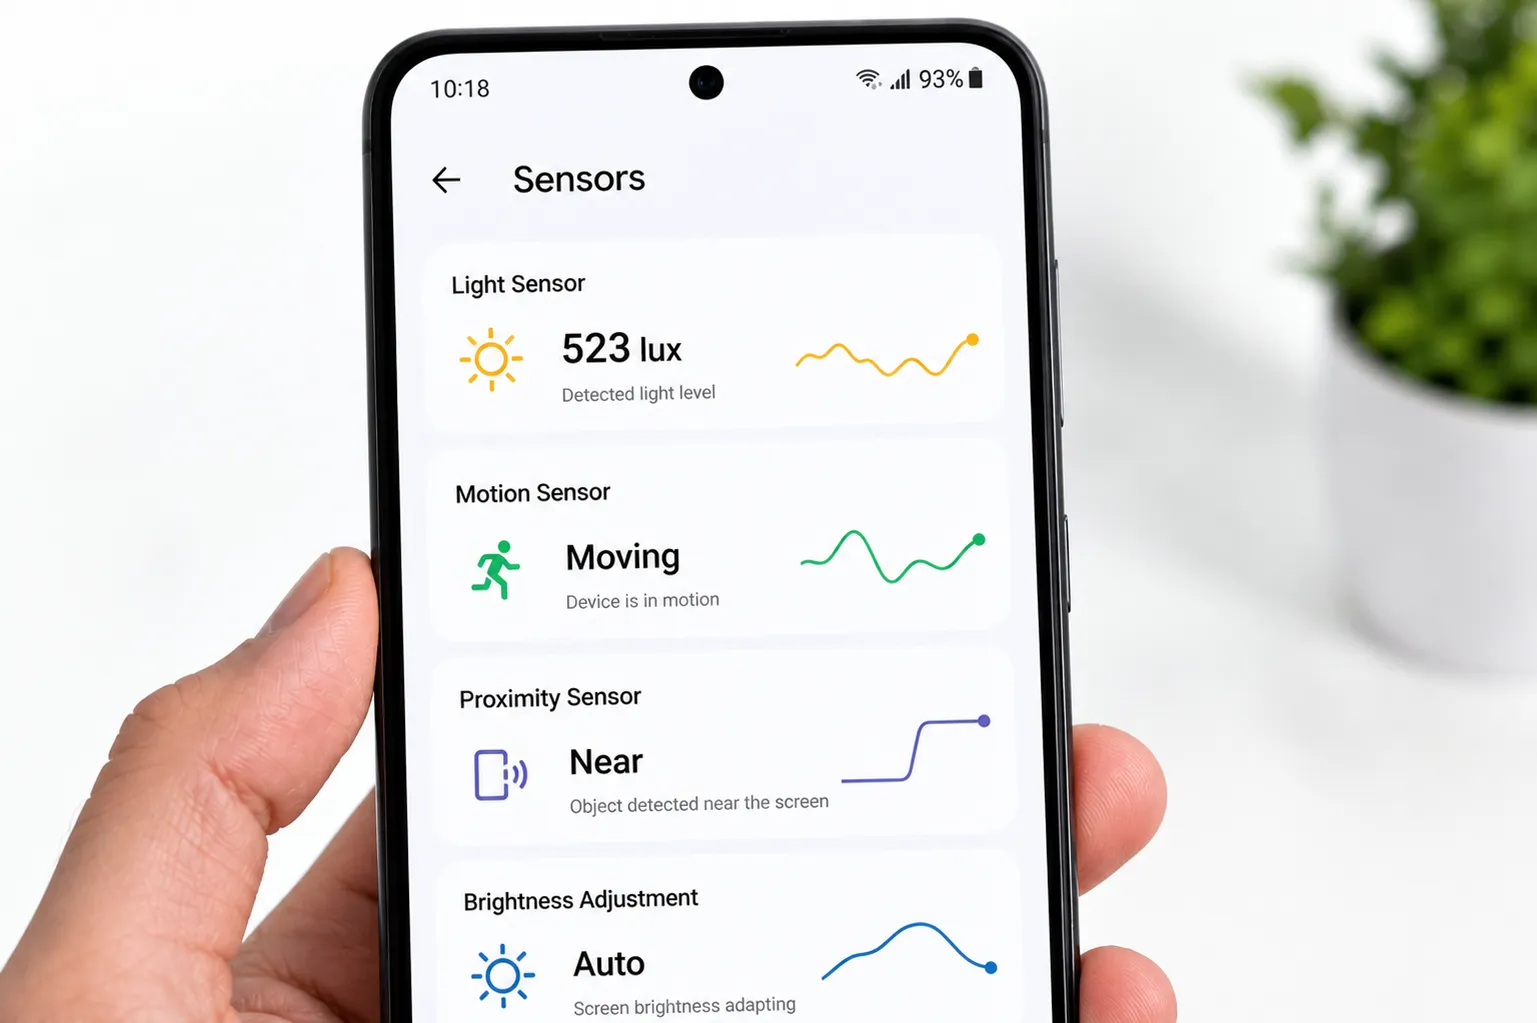
If your device does not provide built-in diagnostic tools, using third-party apps is one of the most effective ways to test Android sensors. These apps are designed to display real-time sensor data and help you quickly identify whether a sensor is working properly.
Sensor testing apps are easily available on the Play Store and offer a detailed overview of all major sensors in one place.
How to Test Sensors Using Apps:
- Open the Play Store and search for a reliable sensor testing app
- Install and launch the app on your device
- Navigate to the sensor section within the app
- Check real-time values by moving or interacting with your phone
These apps typically display readings for sensors such as the accelerometer, gyroscope, proximity sensor, and light sensor. If the values change when you perform actions like tilting the device or covering the sensor, it indicates that the sensor is functioning correctly.
Benefits of Using Sensor Testing Apps:
- Provides detailed and accurate sensor data
- Easy to use even for non-technical users
- Helps detect both minor and major sensor issues
In case a sensor shows no activity or incorrect readings, it may point to a software bug or hardware problem. You can then proceed with troubleshooting steps or consider professional repair if needed.
For more tools that can improve your device performance and usability, you can explore this list of useful Android apps for everyday tasks.
Using apps for testing gives you a deeper insight into your device’s hardware and helps ensure everything is functioning as expected.
9. Manual Sensor Testing Methods
Manual testing is one of the simplest ways to check whether your Android sensors are working correctly. Unlike advanced tools or apps, these methods rely on real-life usage scenarios to verify sensor behavior. They are quick, practical, and do not require any technical knowledge.
By performing a few basic actions, you can easily identify if a sensor is responding as expected or showing signs of malfunction.
Simple Ways to Test Sensors Manually:
- Cover proximity sensor during a call: Place your hand over the top front area of the phone while on a call. The screen should turn off automatically. If it stays on, the proximity sensor may not be working.
- Rotate the phone to test auto-rotate: Turn your device sideways while viewing a video or webpage. The screen should rotate smoothly. If it does not, the accelerometer or gyroscope could be faulty.
- Use a compass app to check magnetometer: Open any compass or navigation app and move your phone. The direction should update in real time. Incorrect or stuck directions may indicate a problem.
These manual checks help you quickly understand how your sensors behave during normal usage. If the expected actions do not occur, it may point to a software issue or physical blockage near the sensor area.
When Manual Testing Helps Most:
- When you want a quick diagnosis without installing apps
- When checking sensor behavior in real-life situations
- When verifying fixes after troubleshooting steps
Manual testing is a practical first step before moving to advanced diagnostics or repairs, helping you confirm whether further action is needed.
10. How to Fix Sensor Problems
Sensor issues on Android devices are often caused by minor software glitches or temporary conflicts. In most cases, you can fix these problems without professional help by following a few simple troubleshooting steps.
It is recommended to try these solutions one by one and check if the issue is resolved after each step.
Effective Ways to Fix Sensor Problems:
- Restart your phone: A simple restart can fix temporary system glitches that may be affecting sensor performance.
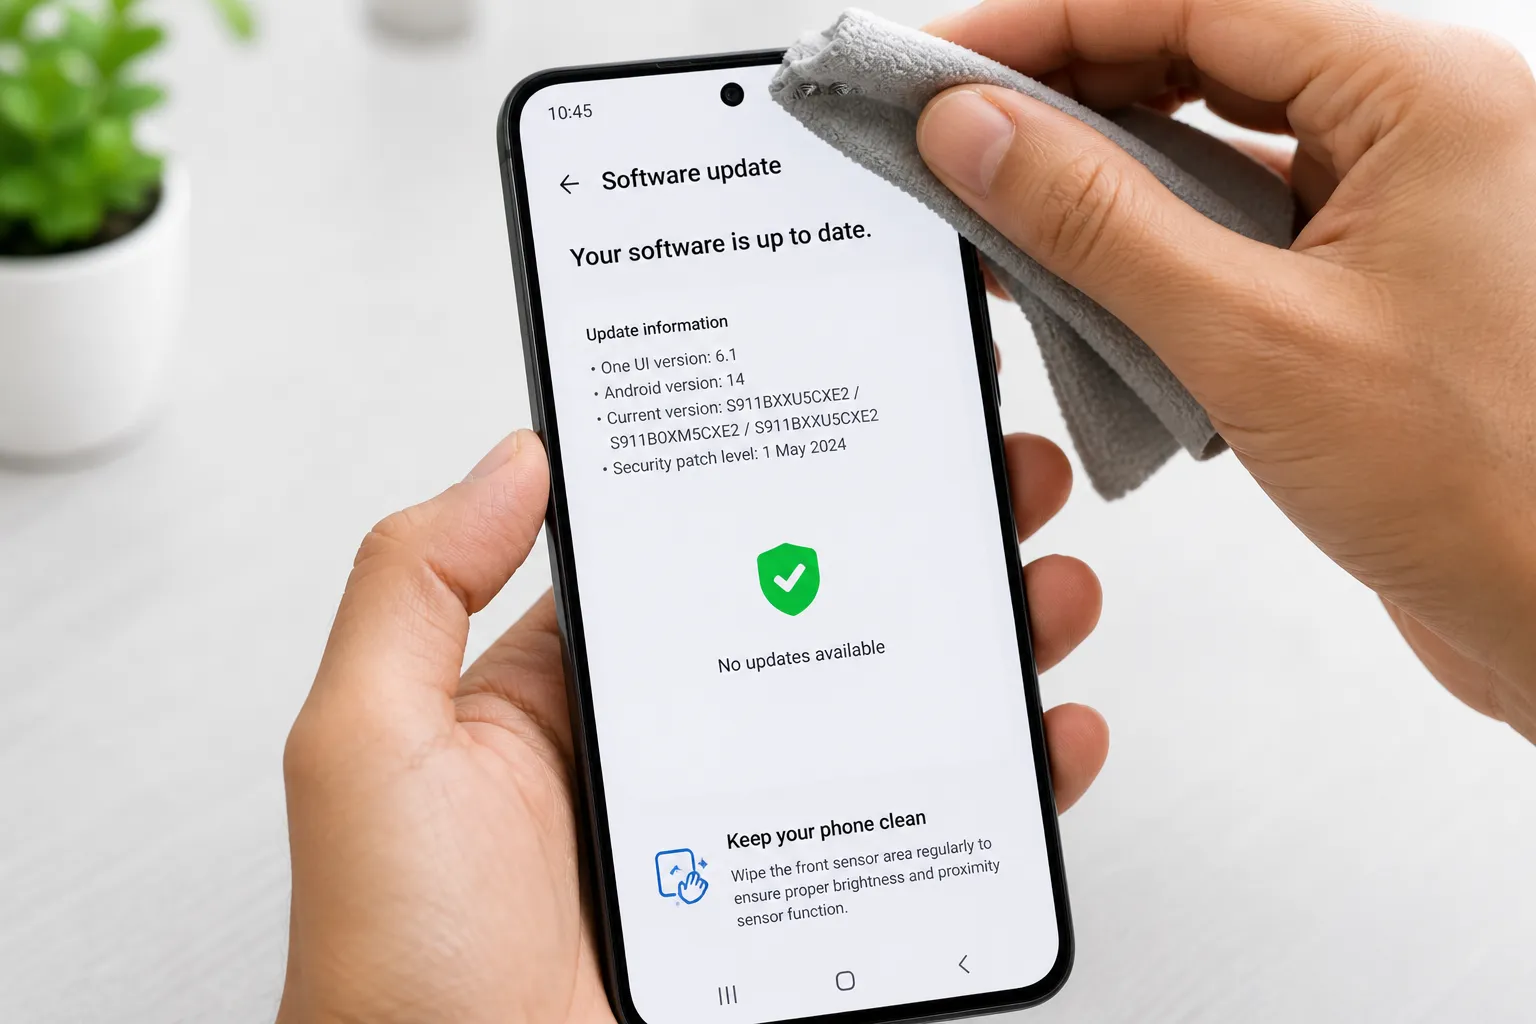
- Update Android software: Make sure your device is running the latest version of Android. Updates often include bug fixes and improvements related to sensor functionality.
- Clear cache: Cached data can sometimes interfere with system processes. Clearing cache helps refresh the system and may restore proper sensor behavior. You can follow this step-by-step guide on clearing cache to improve performance.
- Remove problematic apps: Some third-party apps may conflict with sensor access. Try uninstalling recently installed apps to identify the cause.
Additional Tips:
- Boot your phone in Safe Mode to detect app-related issues
- Check if sensors are blocked by dirt or accessories
- Reset app preferences if permissions are causing conflicts
If none of these methods work, the issue may be related to hardware damage. In that case, further inspection or professional repair might be required.
Applying these fixes carefully can resolve most sensor-related issues and restore normal device functionality.
11. When to Visit Service Center
While many sensor-related issues can be resolved through basic troubleshooting, there are situations where professional assistance becomes necessary. If your Android sensors fail to respond even after testing and applying fixes, the problem may be related to hardware damage.
Ignoring such issues can lead to further complications and affect overall device performance. Knowing when to seek expert help can save both time and effort.
Signs You Should Visit a Service Center:
- No response during testing: Sensors do not react in settings, apps, or manual tests
- Issue started after physical damage: Problems began after a drop, water exposure, or impact
- Factory reset did not fix the issue: Even after resetting the device, sensors still do not work
- Inconsistent or incorrect readings: Sensors give unstable or inaccurate data during use
What to Expect at the Service Center:
- Complete hardware diagnosis using professional tools
- Identification of damaged components
- Repair or replacement of faulty sensors
It is always recommended to visit an authorized service center to ensure proper handling of your device. Using unauthorized repair services may lead to further issues or void your warranty.
Taking timely action when hardware issues are suspected helps prevent additional damage and ensures your device continues to function reliably.
12. Final Tips
Maintaining your Android sensors is essential for ensuring smooth performance and avoiding unexpected issues. While sensors are built to be reliable, a few simple habits can help keep them functioning properly over time.
Best Practices to Keep Sensors Working Smoothly:
- Keep your device clean: Dust or dirt near the front camera and sensor area can block readings, especially for proximity and light sensors.
- Avoid low-quality accessories: Thick or poorly designed screen protectors can interfere with sensor accuracy.
- Update your device regularly: Software updates often include bug fixes that improve sensor performance and stability.
- Install trusted apps only: Unverified apps may cause conflicts or misuse sensor permissions.
- Handle your phone carefully: Physical damage from drops or water exposure can permanently affect sensor hardware.
Following these practices can reduce the chances of sensor-related issues and help your device perform consistently in daily use.
Conclusion
Checking Android sensors is a straightforward process that can help you detect problems early and avoid major complications. From built-in settings and manual tests to advanced troubleshooting methods, there are multiple ways to ensure your sensors are functioning correctly.
Regular checks, timely updates, and proper care play a key role in maintaining overall device performance. By staying proactive, you can keep your smartphone running efficiently without unexpected disruptions.
Helpful Resources
For additional guidance on device safety and consumer awareness, you can refer to the FTC Consumer Safety Guide.